Saturday, October 13, 2012

Burgers for Dinner


UD's favorite meal is a burger.  Every time!  Under any and every circumstance.  So here's your burger baby.

Start with about a pound of 85% ground chuck.  Add a couple of tablespoons of steak sauce, freshly ground black pepper and a couple of large pinches of kosher salt.


Grate a quarter of an onion right over the hamburger.  Then you will get all the onion liquid, along with the grated onion.


Mix everything together and separate into two even sections.


Pull the two even sections out and flatten to about a 1/2 inch.


Then I cut those in half, just for the ease of flipping them in the pan.


Once that is done, I wrap it and put it in the fridge for an hour or so.  This will get all the flavors mixing and mingling.  This step can be passed over in the case of sever hunger pains, or excessive drooling from your loved one.

Next get your sides ready.  I am going with grilled corn-on-the-cob and some pickles.


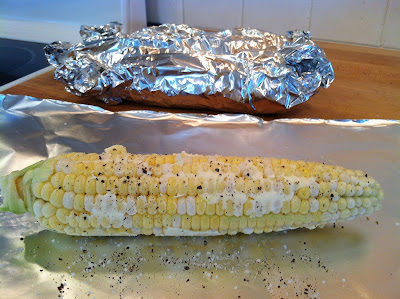
Slather (great word, huh?) the corn with softened butter and sprinkle liberally with salt and pepper.  Wrap it in foil and it is ready to go on the grill.


I chose multigrain bread, because healthy options are always at the top of my mind.  Really?  I like to scoop out the inside, because less bread and more beef is a winning combination.


More slathering, because healthy options are it tastes sooo good.


Cook the burgers over medium to medium high heat.  Leave it for 5 minutes without touching.  They will get nice and brown on one side and then you can move onto the next side.  Probably another 5 minutes will do nicely.


While they are cooking, start grilling the corn.  After 5 minutes or so, add the bread to get a nice buttery toast to it.


Meanwhile back at the ranch, I have discovered some leftover bacon from breakfast the day before.  Oh boy, did that made me happy!  :)  It is already cooked, so I just placed it on the burgers to warm it up a touch.


When the burgers are cooked, remove them to a plate to rest.


And put the bacon to the side also.


Next bring in the toasted roll.


And start assembling.


A little spinach on the top for good measure, and a little color.


And away we go!


It is great to be back.

A bientôt!


Thursday, March 29, 2012

Cockles and Muscles Alive Alive Ho!

UD and I have been craving steamed muscles.  So the other night we finally partook.  There is a wrench in this story, however.  Dr. M told UD that he is diabetic, and therefore has to start choosing better carbs, and a healthier diet in general.  Hence the following:

Steamed Muscles in Wine and Butter Sauce:
This was going to be our meal, rather than an appetizer, so I bought 4 lbs of muscles.  I soaked them for about 10 minutes in 2 tablespoons of flour and enough water to cover.  That will make them spit out the sand.  If some of the muscles are open, and don't close if you tap the shell, they are most likely dead.  Don't take any chances, just throw them out.


While the muscles were soaking, I got together a loaf of multigrain bread (good carbs), some compound garlic butter I had frozen, and some chives.


I cut the loaf in half vertically, and then horizontally.  Later I froze the half I wasn't using, which will be great for another time.  I mixed the chives into the softened butter, and spread it liberally (not endorsed by Dr. M) on the bread.    I put them on a foil lined baking sheet, and set it aside.


Next I pulled out some dry white wine, chicken broth, butter, garlic (smashed) and onion (chopped), along with red pepper flakes for a little kick!


Then over medium heat I melted the butter.


Once that was melted, I added the onion and sautéed until the onion was soft.


Next I put in the garlic and 1 teaspoon of red pepper flakes.  I sautéed that until the garlic was a little golden and the red pepper had a chance to wake up!


Next came a half a cup of wine and a half a cup of chicken stock.  Once that came to a steady simmer, I added the muscles.


I covered the pot and let the muscles steam for 5-6 minutes, stirring lightly halfway through.


The oven was preheated to 375 degrees, so I added the chive and garlic bread and let that bake for 8-10 minutes, or until golden and oh so delicious.


Lastly, I placed the muscles and that delicious broth in a big "sharing" bowl and wedged in some toasty bread.  The only thing missing was the song Molly Malone in the background!


So the good is the fact that we used multigrain bread.  The bad is that we used the butter liberally.  But this is a meal that we would consider just OK for the new diet.  You will see a lot better choices in general, with an occasional dab of butter.  Let's face it folks, everything tastes better with butter.  :)


A bientôt!  See you soon.

Saturday, March 17, 2012

Update on the Pretty Pot of Parsley


The little sprout heads are popping up!


Now they are coming fast and furious.  Being a novice, I put the whole packet of seeds in this one tiny pot.  Sister E nicely but firmly instructed me to weed them out as they grow.  Oil well ...  Live and Learn.  :)


A bientot!  See you soon.

Friday, March 9, 2012

Kale Chips


I have been hearing about Kale chips on the Food Network for many a moon now.  The general thought it that it is a nice healthy alternative to potato chips.  What is not to like about that?  Read on.

Start with a bunch of fresh kale.


It needs to be de-stemmed.  Is that a word?


Rinse it well and then dry as thoroughly as possible.  I love salad spinners, and since there are just two of us, I use the smaller version.  It spins out so much water.


Pat it dry with paper towels.


Sprinkle it lightly with extra virgin olive oil and salt.  Place the kale on a cookie sheet that is lined with parchment paper or foil.  Bake it at 350 degrees for about 20 minutes.


In the end, the kale was mostly crispy, a few pieces were less so.  Maybe I had a little too much EVOO.  But it definitely had a nice texture.  My problem was that I didn't really taste much more than EVOO and salt.  Which is quite delicious, but really not what I was going for.  The kale actually had little flavor.  I guess I just rather skip the potato chips!


A bientot!  See you soon.


Monday, March 5, 2012

A Pretty Pot

I am going a little bit country here.  I have never planted anything from seed, but I was inspired by Sister E, over at THBTOH.  So here goes nothing!


The chives have a head start.


But with a little water, sunshine and a pretty pot, I have lots of faith in the parsley!


I'll keep you posted.  Get it?  Posted?


A bientot!  See you soon.


Monday, February 27, 2012

Perfect Roasted Chicken

This was so tender and delicious.  I may never buy an already roasted chicken from the supermarket again.  Well, never say never.

6 lb chicken
2 tbls melted butter
EVOO
Seasoned salt (or Kosher salt and paprika)
Ground black pepper
2-3 in chunks of onion, carrots and/or potatoes

Preheat oven to 425 degrees

Remove giblets and dry chicken as much as possible.  Sprinkle the inside cavity with generous amounts of salt and pepper.

Place veggies in 9x13 roasting pan and sprinkle over EVOO, salt and pepper. Mix to coat all well.

Place chicken over the veggies. Brush melted butter all over the chicken. Season generously with salt and pepper.

Tie up legs with an elastic cooking band or twine.


Roast for 1 ¾ hours, loosely placing tin foil over the chicken once it is golden brown.

Remove from oven, and let rest for at least 20 minutes.


And the veggies that were underneath the chicken are also tender and delicious.  Enjoy.


A bientot!  See you soon.


Monday, February 20, 2012

Adding to the Family

I am slowly adding to, and updating my kitchen arsenal.  As you have probably gathered from previous posts, I have one counter top that is my main cutting board.  On that, I keep the ingredients I use most often, but they also have to look nice.  ;)

Up until now, that consisted of Kosher salt and EVOO.  The salt has been kept in a beautiful salt keeper from Williams Sonoma.  It was a gift many years ago from Sister N, and I really love it!  And the EVOO was in a glass pour bottle I had picked up at Home Goods.

Now I use a lot of canola oil too.  So I needed another bottle, and while I was at it, I updated the bottle for the EVOO.  There is a great kitchen store in Portland, called Leroux Kitchen, so off we went bottle shopping. 

And of course I got my favorite Christmas present from Sister E.  The Unicorn Magnum Plus! 

Also I am slowly adding some Herbs.  It has been driving me crazy not having the fresh Herbs I had all summer.  So I started with chives, and will move from there to parsley.


Doesn't it just make you feel warm and fuzzy inside?


A bientot!  See you soon.


Thursday, February 16, 2012

Manicotti and My Favorite Hand Model

Every now and then the planets align, the sun is shining, and there appears to be an intense connection between UD and me, mentally that is.  That just happened on a recent Spring Winter day here on the Rocky Coast.  We were enjoying a Sunday morning breakfast, and of course the Food Network channel was on.  I have taken a fancy to a new FN star, called The Pioneer Woman.  She started with a food blog, and now is a staple on the FN.  And it just so happens that UD will actually watch this particular show with me, because (1.) he loves the scenery and (B.) he enjoys seeing what the cowboys and the kids are doing to run the ranch. 

Right after that program, up came Rachael Ray with her new show, "A Week in a Day".  I am not a huge RR fan, because sometimes she is just a little too jovial. And I haven't really tried any of her recipes, because they were pretty basic in her original show called "30 Minute Meals", and it was actually a lot like I cook.  Not that I didn't grab a great tip here and there.  She (and most of the others) have little things they do, that you stop and say "hmm I never thought to do it that way".  Like what?  Well I can't think right now.  But I will put it in the back burner of my mind, and hopefully come up with one or two before the end of this post.

Anyhoo, this is where the planets started aligning and yada, yada.  UD does not care for RR at all, so when the show started, I expected him to wander off and find something else that might need his attention.  But no.  He actually stayed.  I am guessing that in his mind, it was probably just until he was finished with breakfast. :)  What she does in this show, is make 5 different dishes, one for each night of the work week, and explains how to store and reheat them during the week.  Well I think she was probably at the second recipe of the show, when UD and I looked at each other and smiled.  We both new what was for dinner that night! 

It was Veal or Turkey and Spinach Manicotti.  If you look at the reviews, you will see that I posted the first one!  Ah, my 5 minutes of fame.  So fleeting, but so fun.

It was just for the two of us, and I didn't want to have leftovers for a week, so I cut the recipe in half.  Here is what I did, and what I used.

1/2 pkg. chopped frozen spinach, thawed
If you don't have time to thaw it on the counter top, you can easily defrost it in the microwave.
1 tablespoon EVOO
1 pound ground beef (I used 80%)
1/2 medium onion, finely chopped
2 cloves of garlic, finely chopped
1/2 cup dry white wine
2 cups passata in glass jars (Italian tomato puree)
Our Hannaford didn't have that, so I used canned tomato puree.

2 tablespoons butter
1 1/2 tablespoons flour
1 cup of whole milk
Nutmeg
Salt
Pepper
3 ounces of soft cheese with herbs
I used light Boursin
1/2 cup freshly shredded Parmigiano Reggiano

7 manicotti pasta tubes

It is recipes like this that I like to break up into stages.  It is less frantic, and therefore less intimidating.  It is nice to have a little calm in the kitchen.

Step 1 - Manicotti stuffing mixture
Step 2 - Pasta preparation
Step 3 - Casserole assemblage', or, for the non-fake French, then assembly
Step 4 - Bechamel sauce or white sauce, which is one of the mother sauces of French cuisine.  And sooo easy.
Step 5 - Top off and bake

Now five steps may seem overwhelming, but remember this.  Each step can be done, and then set aside.  You are not fighting with the clock to get all the steps done without any of the food getting cold.  Everything can come to room temperature, right up until the bechamel sauce.  This is a casserole and will be baked in the end, and come out nice and bubbly hot.

----------------------------------------------------------------------

Step One:  Manicotti Stuffing Mixture
Place thawed spinach in a clean dish towel and wring out all the excess water.  Then separate the clumped up spinach and set aside.
Heat the EVOO in a pan over medium heat.  Pat the meat dry with paper towels, and then place in the pan.  Sprinkle with salt and pepper.  Once the meat is broken up and browning nicely, add the chopped onions and cook until everything is nicely browned or caramelized.


Pour in 1/2 cup of dry white wine and stir.  Then add the spinach and 1 cup of tomato puree, and stir everything together.


Reduce the heat to low, and simmer for 15-20 minutes. Stir occasionally.


Place the remaining cup of tomato puree to your casserole dish, and set aside.


Step Two:  Pasta Preparation

Have the manicotti ready and waiting.

Get a big pot and fill it with cold water and lots of salt. Put it over high heat, and bring it to a boil.


While that is coming to a boil, grab a large bowl.  Put in 1 or 2 tablespoons of salt, lots of ice, and cold water.  Set this aside.  This will be what is used to stop the manicotti shells from cooking once it is cooked to al dente.


Once the water is boiling, add the manicotti.  Cook it for 5 minutes, no matter what the package directions are.  This is a tip that RR used in the TV show, that aren't included in the recipe directions.


Carefully remove the pasta from the boiling water and place it in the salty ice water bath.  Then carefully place it in a colander and let it drain.


Step Three:  Casserole Assemblage'  :)
Use the casserole dish to help you fill the manicotti.  Place the bottom of the shell against the edge of the dish.  That way it won't slip and cause a problem getting it stuffed.  Use a smallish utensil, like my lovely model appears to be using in these photos.  Hip Rah for my fav hand model UD!


Get it all nestled in, and move onto Step 4.


Step Four:  Bechamel Sauce
Melt 2 tablespoons of butter over medium heat.  Add 1 1/2 tablespoons of flour, and whisk for 1 full minute.  This will get rid of the pasty flour taste.


Then add the milk. Bring it to a simmer, where it bubbles slightly, and season with salt, pepper and a touch of ground nutmeg (optional). Cook this until it is thick enough to leave a film on a spoon. It will only take 2-3 minutes, if that.


  Now stir in the Boursin. Mmm Mmm good!


Step Five:  Top off and bake

Preheat the oven to 375 degrees.  Pour the bechamel over the manicotti.


Then sprinkle a 1/2 cup of Parmigiano Reggiano over the top.


Cover with foil.


Bake for 40 minutes at 375 degrees, and remove the foil.  Bake for an additional 20 minutes, uncovered, until it is bubbly hot.


Serve it up and enjoy.


It really was good. I cooked 7 manicotti, thinking UD would have 4, and I would have 3. He had 2 and 1/2, and I had 1 and 1/12. We each had one for lunch the next day, and the next!  Sometimes things just work out that well. :)

A bientot!  See you soon.